# Teams Dashboard
The Dashboard in Freebetrange is a tool designed for poker teams and schools to manage players, track training progress, and control preflop strategy in one place. It helps you organize the training process and ensure consistent strategy across all players.

# Leaderboard: track progress
This is the main page of the dashboard, where you can track all your students' activity and training performance. For each student you can see their last login date, number of hands and ranges trained, score for each type of training, and overall score.
The filters above the leaderboard let you adjust the displayed data quickly. You can:

- find a specific student using the search field
- set from and to dates to see training stats for a specific period
- show only students from specific groups
- filter by specific trainings — by default you see aggregated stats across all trainings, but you can pick a particular drill
All these filters let you track your students' progress in detail — both overall and when checking homework. For example, if you assign BTN training for the following week, after that week you can quickly see how well all your students completed the task.
Note that you can sort the leaderboard by any column. That way you can sort your students by different metrics — for example, last login to the app, number of hands played, and so on.
# Students: manage players and licenses
On the Students screen, you manage your students and their Freebetrange licenses.

# Adding a student
To add a student, click the Add student button in the top-right corner, enter their email and label (optional). Labels are for internal use only — a short note per student to make management easier.
Then click Add, and a new user appears in your students list. The user must confirm joining your team by clicking the link in their email. Until they do, the student stays in Pending status.
After the student clicks the confirmation link, refresh the page — they are now a full member of your team.
# Manage licenses
At the top of the page, a purple banner shows how many licenses your business account has and how many are still available to assign to students.

You can assign licenses in two ways:
- Bulk: click
Apply licensesin the top-right to mass-apply all available licenses to students who are currently on the free plan. - Individual: assign a license to one student by clicking
Activatein the License column.
# More actions on the Students page
You can also do a few more things right in each row of the students table:

- quickly set or change a student's internal label by clicking on
Add labelnear the student's email - add a student to groups via
+in theGroupscolumn - see
last login date(and sort by it to spot the most and least active students) - open a student's personal training history: click the eye icon on the right in their row. That opens their training history so you can follow activity and progress on specific assignments per student.
- remove a student from the team with the trash icon. When you remove a student from the school, all school ranges and trainings are also removed from their account automatically.
# Coaches
Under Coaches you can add coaches who also get access to the dashboard. Click Add coach and enter the email of their Freebetrange account. After you add them, the coach can open the team dashboard and track progress for students in their group (but cannot add or remove students).
You can organize dashboard access for managers and coaches however you like. Some teams share one manager account for everyone — that works just fine. If you want stricter separation, add coaches: they only see training progress for students in their group (how to link a coach to a group is covered later in this guide), while only the manager can add or remove students and assign licenses.
# Groups: sub-teams inside your team
You can create any number of groups inside your team. Each group has its own strategy. Split groups however makes sense for you — by skill (beginners, intermediate, advanced), by format (cash, MTT, spin & go), or any other criteria. How you divide students into groups is up to each team.
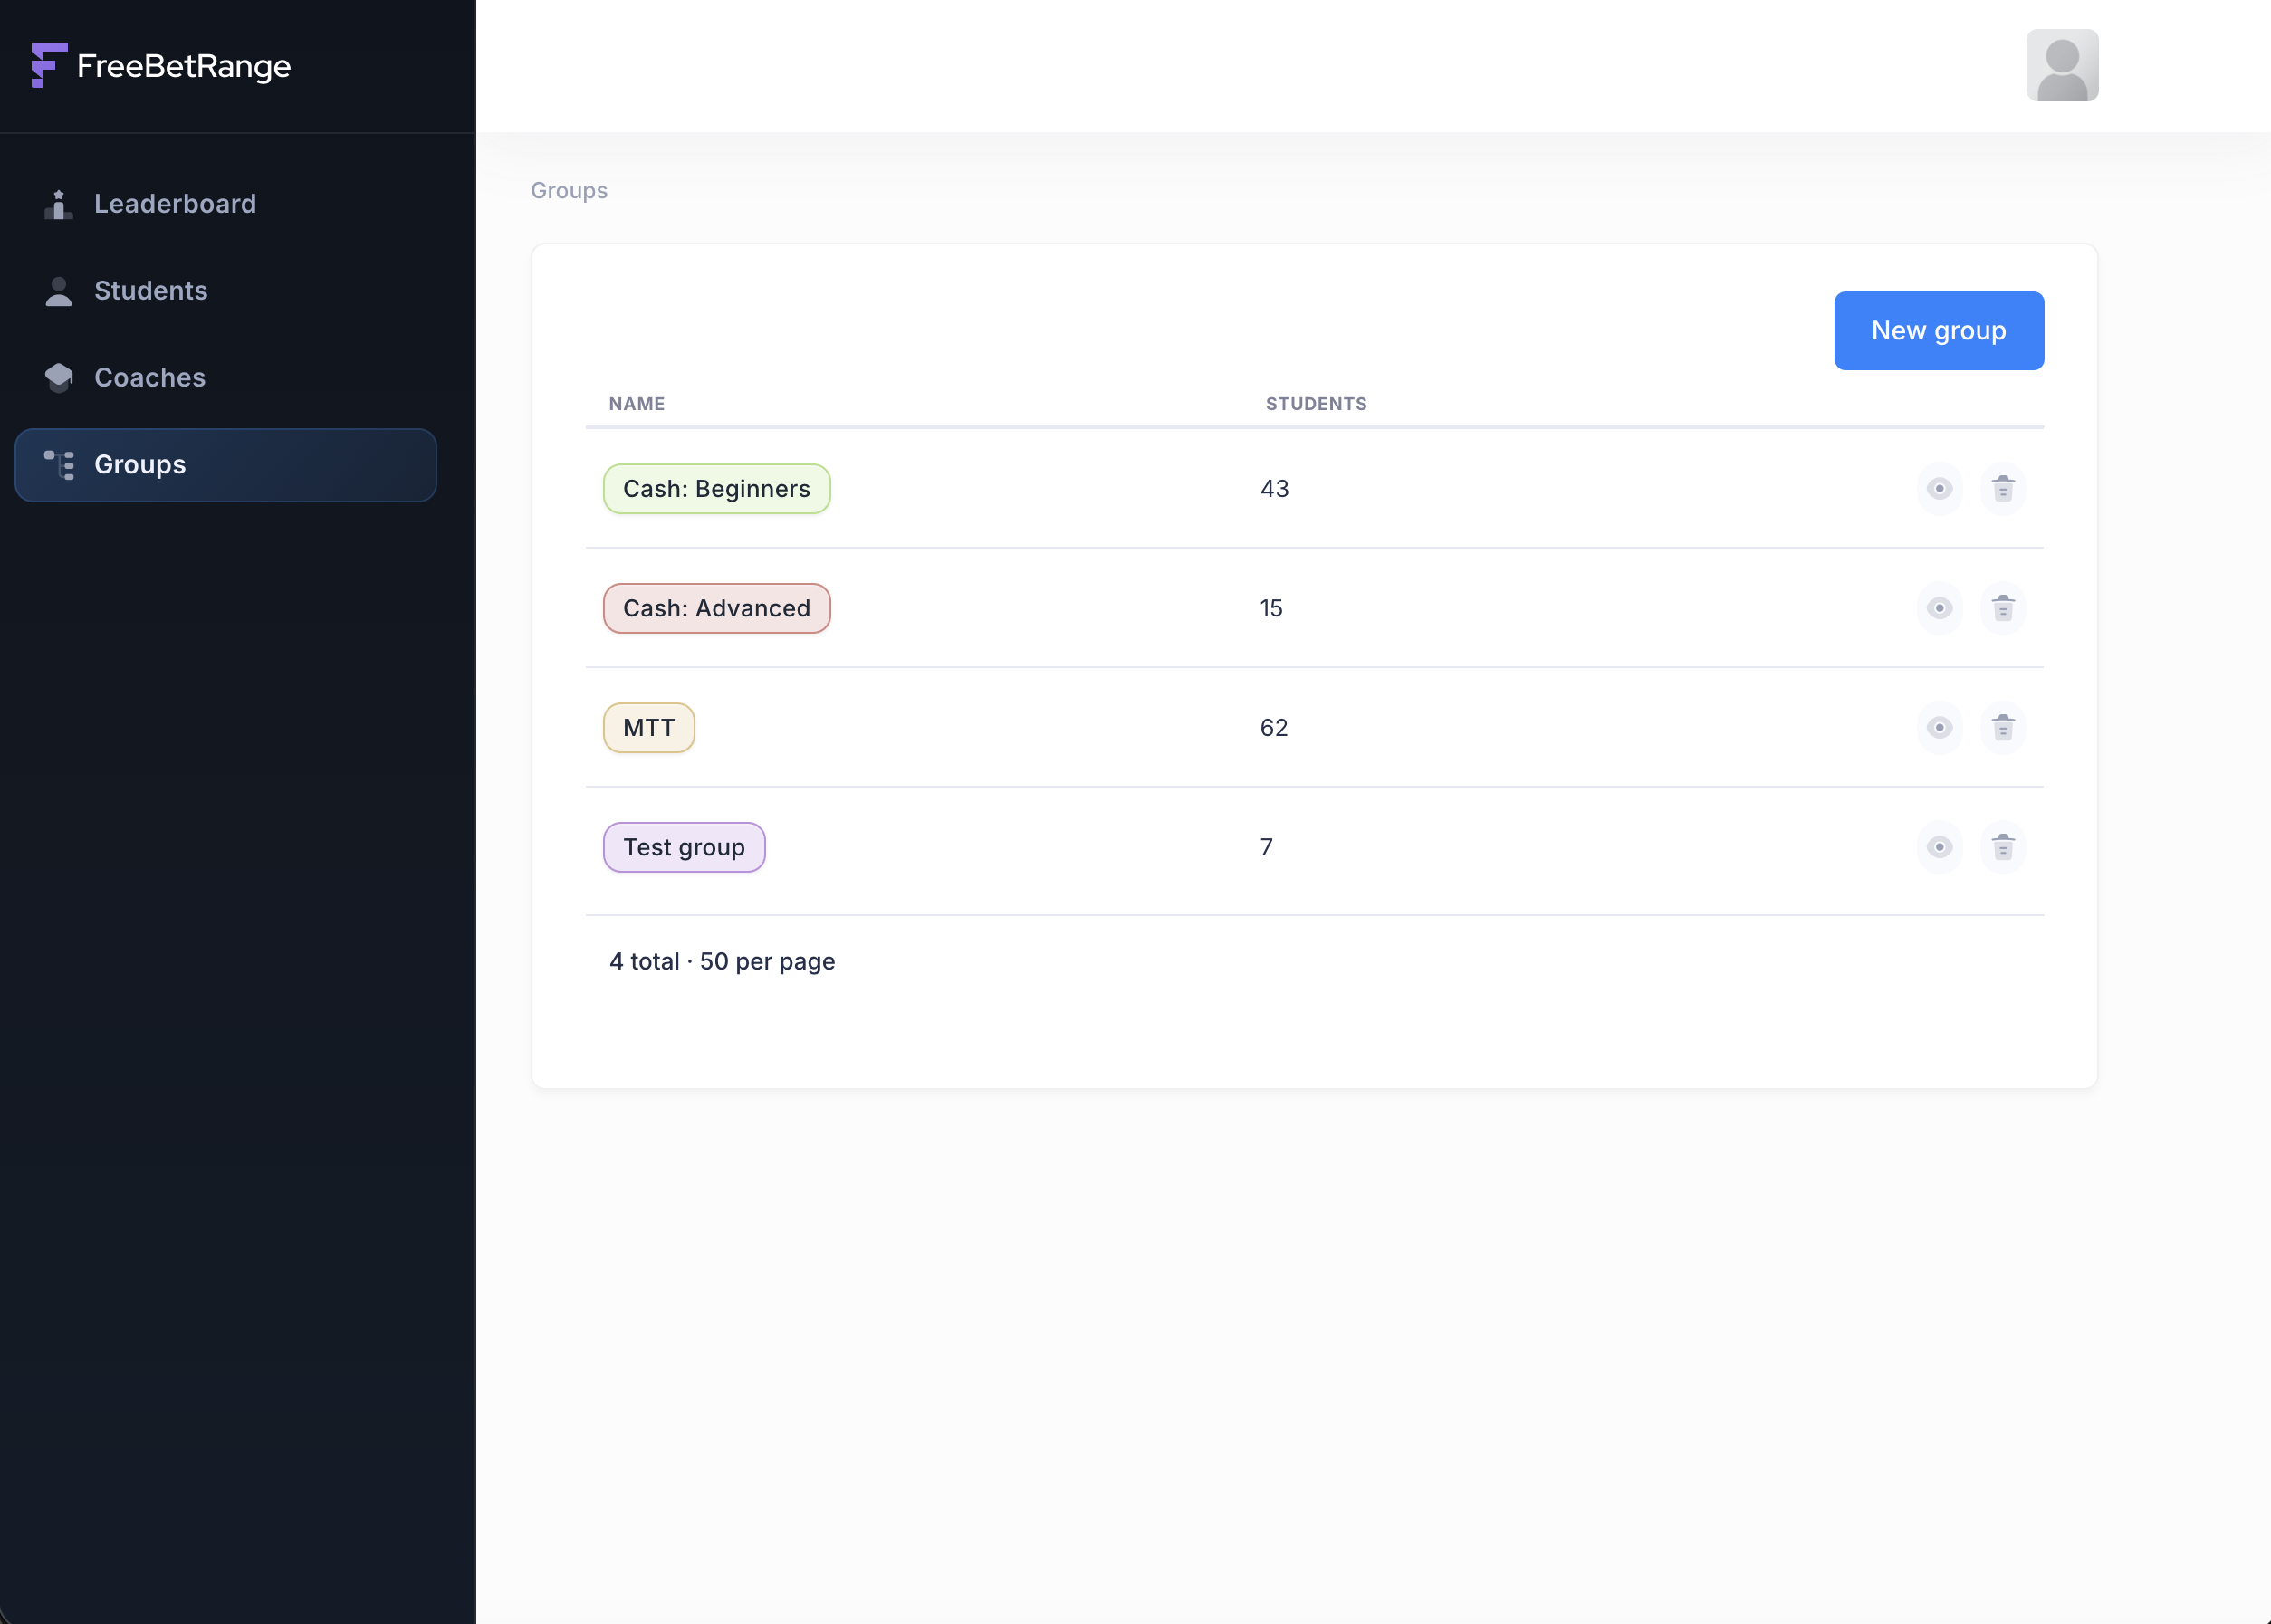
Your team must have at least one group. If you do not want to split students, create a single group (for example, "All students") and add everyone to it.
# Creating a group
Click New group in the top-right. In the dialog, enter the group name and pick a color so this group is easy to tell apart from others.
# Managing a group
Click a group name in the list to open that group's page. There you will see three main tabs: Students, Coaches, and Config.
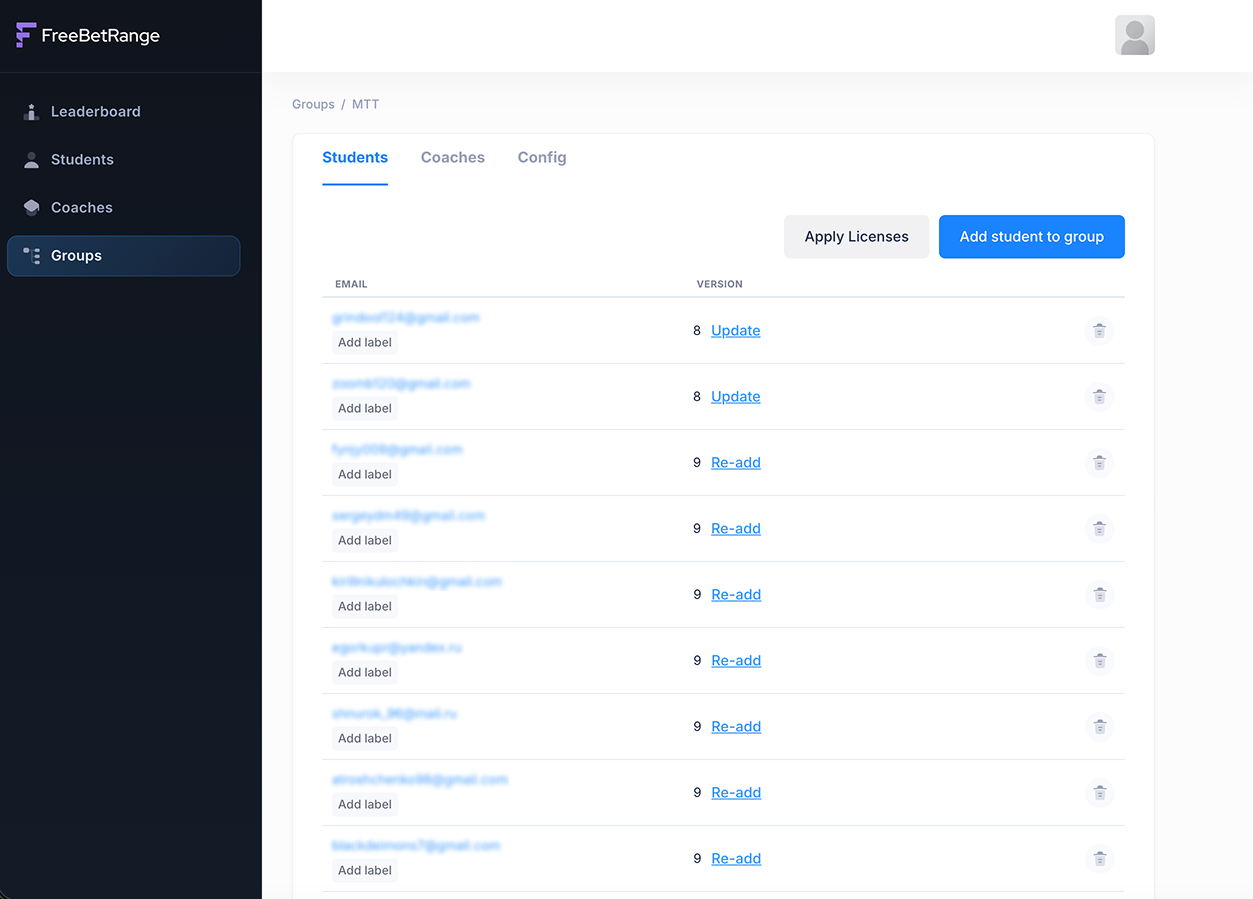
# Students: members of the group
On the Students tab you see everyone in this group. Here you can:
- add students to the group with
Add students to groupin the top-right - grant Pro licenses to everyone in the group with
Apply licensesin the top-right — same idea as on the main Students page, but here licenses apply only to this group. UpdateorRe-addthe team config (ranges and trainings) for a single student (buttons in the Version column) — useful when someone was just added to the group and you need their account to match the latest configuration.
# Coaches: coaches for this group
On the Coaches tab you see coaches responsible for this group. You can add or remove coaches quickly.
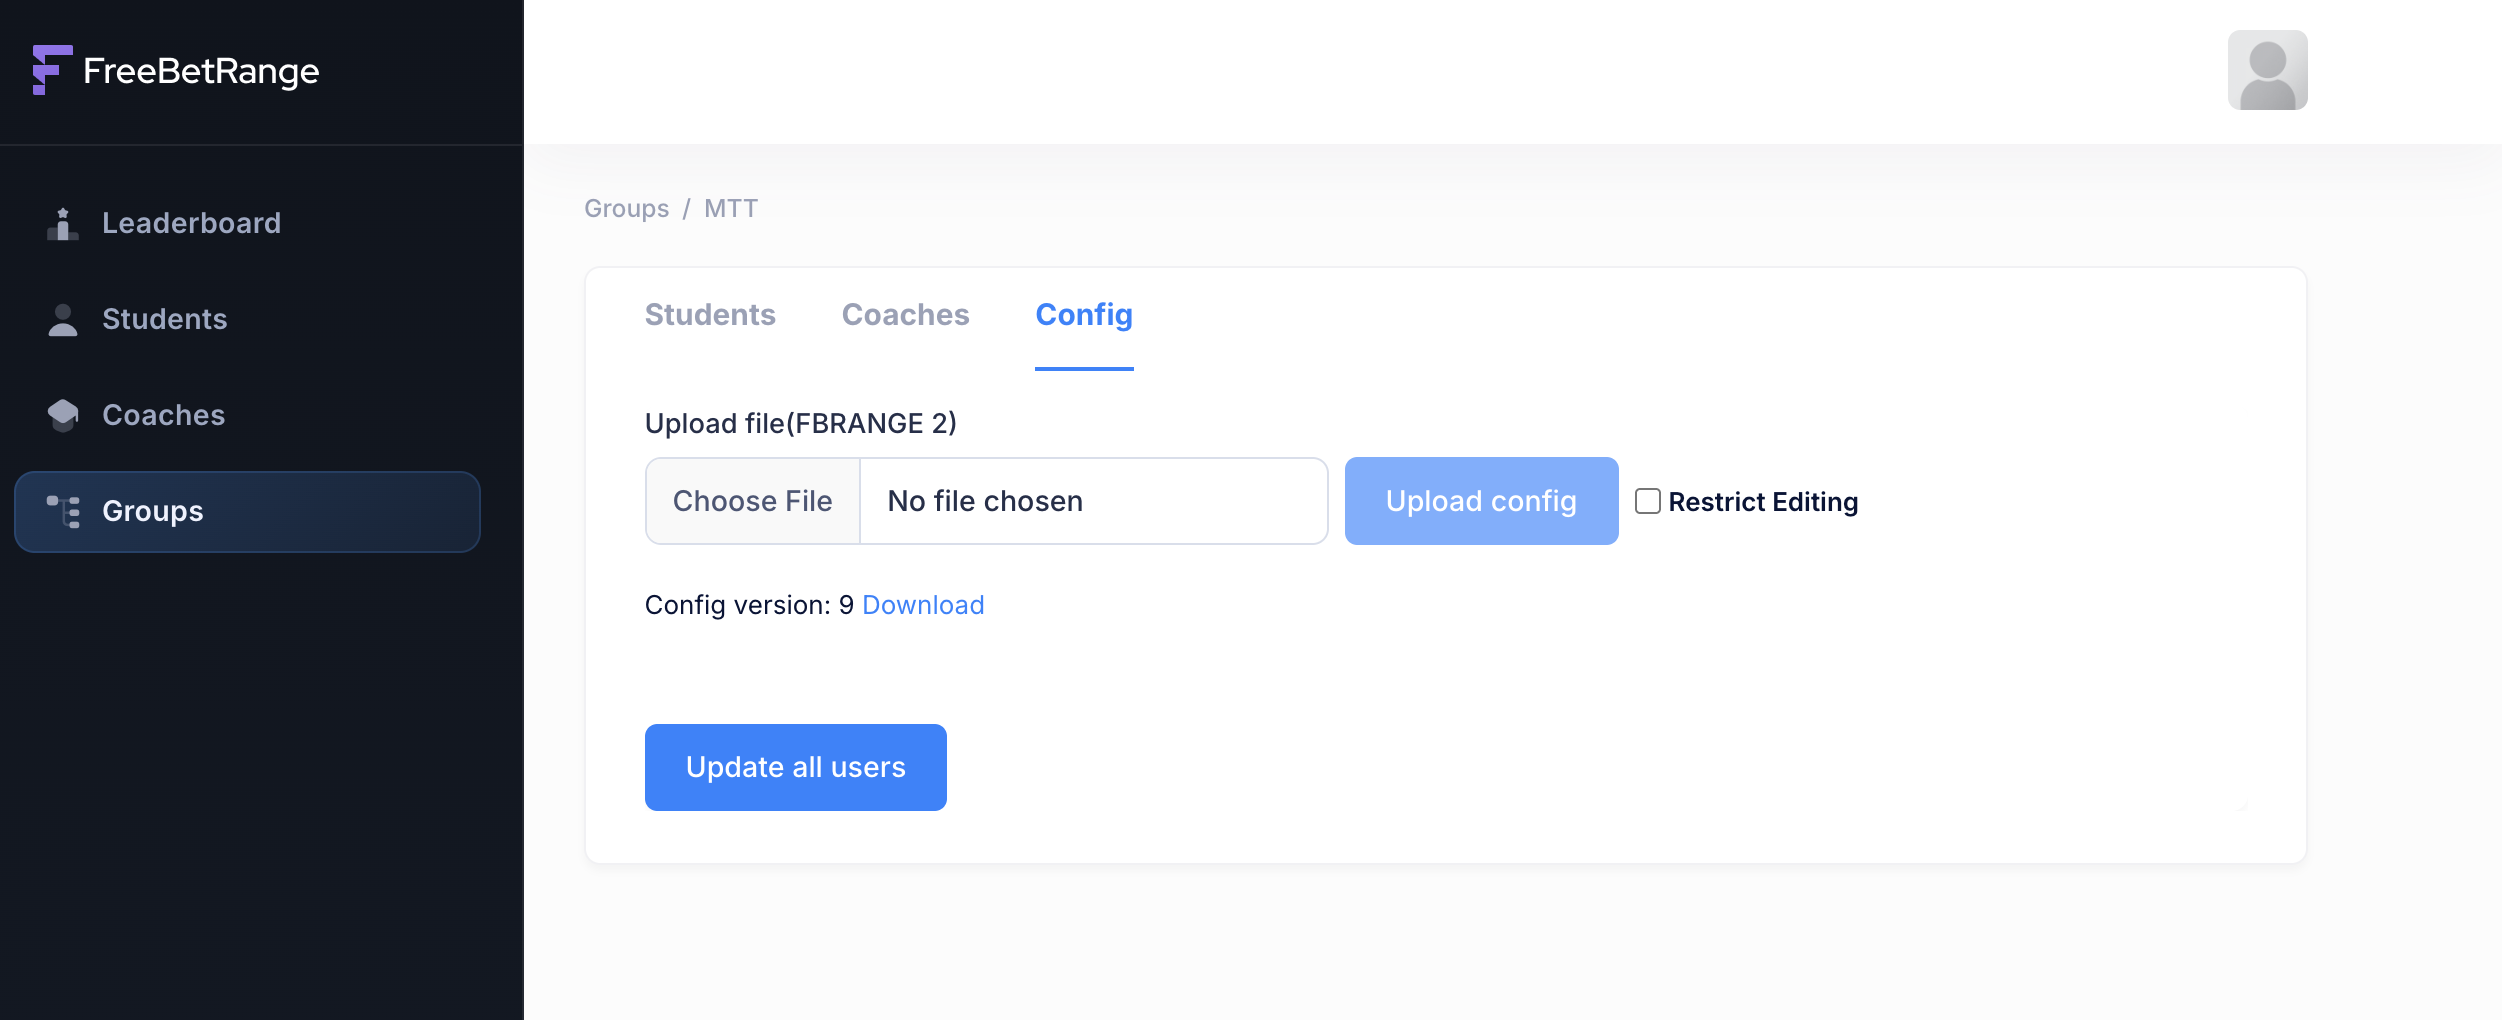
# Config: preflop strategy for the group
On the Config tab you manage this group's preflop configuration.
First, build the preflop configuration (ranges and trainings) you want on your students' accounts. Use any Freebetrange account and create the ranges and trainings in the app — you can build from scratch, use built-in GTO solutions, or import from HRC solver.
We recommend a dedicated Freebetrange account as the single place for all team strategies, and always use it when you change ranges or trainings. We provide Pro for free on that "strategy holder" account. Several people on your team who work on strategy and drills can share access to it.
When the configuration is ready, export a .fbrange2 file. When exporting, include both ranges and trainings. Settings are optional — include them if you want every student in the school to share the same app settings.
When you have the .fbrange2 file for this group, return to the group's config page in the dashboard, click Choose file, and select it. You can enable Restrict editing if you want to prevent students from editing ranges and trainings. Turn that on or leave it off as you prefer, then click Upload config.
After upload, Config version updates.
Next, push the strategy to all students in the group. On the same page, use Update all users at the bottom — one click starts updating the configuration for everyone in the group.
Later, when you need to refresh the configuration, repeat the same steps:
- Sign in to your Freebetrange "strategy holder" account.
- Change ranges and trainings as needed (we suggest modifying existing items rather than deleting them when possible — to keep the previous stats).
- Export the configuration as
.fbrange2. - Open the dashboard and go to Config for the right group.
- Upload the updated file, confirm the version increased, then click
Update all usersto roll the config out to all students.
We hope the dashboard becomes a useful, productive tool for improving your students' results!